Trench Liner - Waterproof

$313.86


FREE SHIPPING

Our trench liner is a waterproof material that is composed of HDPE. Designed to be rugged and able to withstand the demands of a job site, the material is puncture and tear resistant while still retaining flexibility. When installed as a trench liner the HDPE is typically laid in the excavated trench with rocks placed directly on top. If multiple pieces are joined to line a long trench the material can be overlapped and connected using our HDPE double sided seam tape (not included).

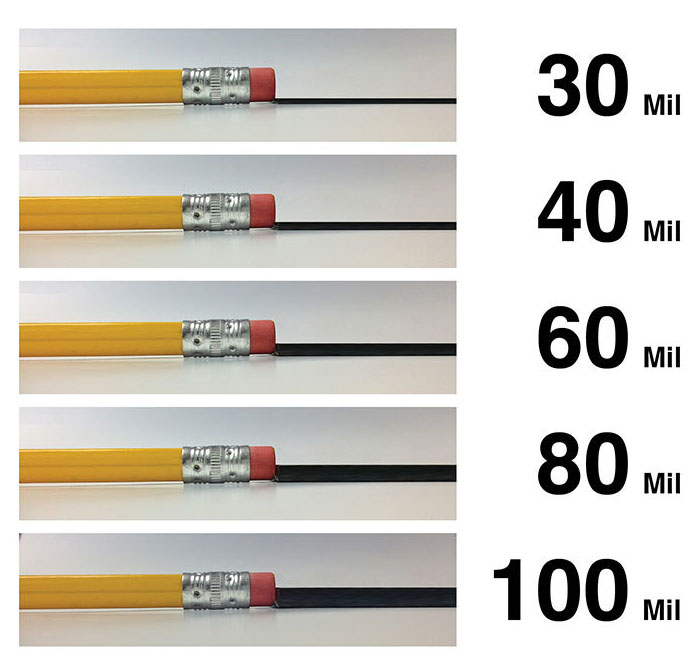
The HDPE trench liner is available in roll widths racing from 18” to 60” and from thicknesses racing from 40 mil to 100 mil. Rolls are available in 100’ lengths. The material is made in the USA.

Please Note: The widest rolls that we offer in HDPE are 60” (5ft).

We are also unable to provide custom roll lengths on orders less than 50 rolls.

RELATED PRODUCT:

We also offer rigid HDPE in 48” x 96” sheets in both black and white colors.

View pricing and product info >

HDPE-Sheet-Turn.jpg__PID:113b1035-abb9-4f7f-b449-97922679ac3d

Product Specifics

  • Material: High Density Polyethylene
  • Texture: Smooth
  • Size: Various
  • Free Shipping
  • Need a Written Quote?
    Request Online > 
  • Volume Pricing Available - orders $6,500+
  • Questions? Call (800) 520-7731

HDPE Plastic

  • Waterproof
  • Commercial Grade
  • UV Resistant
  • Non-Biodegradable
  • Will Not Rot or Mildew
  • Resistant to Rodent and Insect Damage
  • 100 Year Material Lifespan
  • Made in the USA

All of our plastics are professional-grade and are designed for use in both residential & commercial applications. Our plastics are designed for years of continuous use in the designated application.

Connecting HDPE Pieces

There are two ways to connect multiple pieces of HDPE together. One method is to overlap the HDPE and use our double sided seam tape to connect the two pieces. The other method is to butt the ends together and use our 17 mil single sided seam tape to create a solid connection.

hdpe-tape_x700__PID:4c8fa401-60db-429d-8466-7ab1567455d417-mil-HDPE-seam-tape-.jpg__PID:d29d8466-7ab1-4674-95d4-6009217cdb46

Overlap Method
(for underground installations)

The overlap method is best used when connecting two pieces of HDPE in a buried application. Due to the overlap, a ridge is exposed which is not ideal when installed in exposed vertical or flat installations in high traffic areas as there is a possibility of an object catching on the ridge and pulling the two pieces apart.

In a below ground installation, the large overlap area provides a more water resistant connection as well as enhanced protection against tree and plant root intrusion.

View Tape Pricing and Seaming Instructions >

End to End Method
(for exposed installations)

When installing HDPE on a wall, floor or anywhere that is exposed, the end to end method provides a secure connection and does not leave any ridges exposed to potential catching by a person or object.

View Tape Pricing and Seaming Instructions >

Shipping

  • All HDPE Ships for Free (standard ground, see map)
  • Expedited shipping only available on orders over $2,000 
         Call: (800) 520-7731 for pricing and ship times

Shipping estimates shown on the map pertain to this specific product only. HDPE orders typically ship same day if the order is placed before 12:00 noon CST. Transit times displayed in the map are listed in business days, and are approximate. Transit times are subject to stock levels at regional warehouses.  The day that the order is shipped is not counted as a transit day.

Thickness comparison

The below is a thickness comparison of the material. HDPE plastic thickness is measured in "mils" which is "thousands of an inch".

Drain Lining a Field

Trench covered in Rocks

The Best Way To Dig A Trench For Great Drainage

Note: The following information primarily pertains to the French drain method of directing water away from the landscape. The same result can be accomplished by installing an open creek bed with waterproof liner on the bottom. This type of drainage system is often preferred as it is easier, less expensive and less complicated to install while still providing excellent performance.

First and foremost, it's really important you know how to dig a productive trench so water drains away from your property and home without causing any damage to your yard or your neighbor's property. Make sure your ground slopes away from your home or grade your drainage ditch to descend one inch every 10 feet. You should start the trench in a flooded area or near a downspout outlet. Discontinue the drain at a safe place where any water flowing out of the end will not lead to erosion.

If you are stuck with a flooded yard or garden, it can be a major headache. Flooding will drown your plants' roots, cause rotting, and can even damage your home. In most cases, a flooded yard is caused by poor drainage. One of the best ways to dry up a wet miserable yard is digging a drainage ditch and installing a good drain pipe.

The Trench

Dig the trench 18 inches deep and 9 to 12 inches wide. Lay down water-permeable landscaping fabric in the trench followed by 3 inches of gravel. Lay down your perforated drain pipe in the trench, cover it with an additional 3 inches of gravel and cover the drainage ditch with rocks, stones, or soil.

If the drain pipe method is not preferred an exposed creek bed can be installed. For this type of installation a waterproof trench liner should be used to line the bottom of the trench. This will ensure that the water flows quickly downhill and away from your landscape without soaking into the surrounding soil.

Plan Ahead Of Time

Before you start digging the drainage trench, establish the following:

- Where the surface water is collecting in your yard.
-  Determine where the water is coming from.
- Where the water can be redirected so it will not damage your property or your   neighbor's property.

You need a plan to direct the water downhill away from the flooded areas. You can direct the water through a pipe to a location away from your home but the better solution might be a french drain (or exposed creek bed). A French drain is a perforated pipe that will evenly distribute the water underground as it travels away from the flooded area.  When working correctly,  a French drain will eliminate the water spewing out of a traditional pipe end that can lead to erosion.

Figure Out The Slope

In order for water to drain properly, your drainage trench must slope downward at least 1 inch every 10 feet in length.

Figure out the slope in your yard
- Get 2 wooden stakes and mark them at 1-inch intervals.
- Drive one stake into the ground at the point where you want to begin your drain.
- Drive the other stake into the ground at the point where the drain should end.
- Tie a string between the 2 stakes.
- Use a level to ensure the string is level.
- Check the difference in height between where the string is tied on both stakes.   The amount of slope needed will be the sum between the two.

In order for the water to drain properly, the slope must dip at least 1 inch every 10 feet of distance. If your yard is flat, you will need to compensate by creating a slope. When you dig the trench, make sure it's at least 1 inch deeper every 10 feet in order to construct an artificial slope for proper drainage. If you don't have the correct slope, the water cannot drain through the pipe.

Dig The Trench

You need to get a tool that is designed to dig the trench. It's important to create a large enough trench to accommodate gravel and an adequately-sized pipe. Optional trench dimensions are as follows:

Width - 9 to 12 inches
Depth - 18 inches

Remember to deepen the trench in the direction you want the water to travel away from your home or other structures if the ground is flat.

French Drain without fabric

Laying Down Landscaping Fabric or Plastic

Once you have dug the trench, it's time to line it with water-permeable landscaping fabric. The fabric will help prevent grass and plant roots from entering the trench. Invasive roots can destroy drainage ditches, clog pipes, and dismantle your hard work. Also, it's perfectly fine to have excess landscape fabric. You can fold the fabric over the gravel and then cover it.

Alternatively, if the goal is simply to shuttle water away from a given area with minimal soil intuition consider lining the trench with HDPE plastic. This plastic is heavy-duty, puncture resistant and is completely water-proof.

Pour A Gravel Base

Pour 3 inches of gravel into the bottom of the trench which is on top of the landscape fabric liner. This is the ideal installation when working with a French drain because it will let water filter out through the perforated pipe and filter into the soil. Also, an adequate layer of gravel will improve drainage. The simplest drains are trenches filled with gravel.

Note: if you are going be doing additional construction around your drain, outside of normal use. Then using a silt fence fabric as a temporary barrier will help keep the top of your drain clear of silt until your construction projects are completed.